Thursday, August 29, 2013

Quick Inspirations - The Sidebraid


I'm having a love affair with The Sidebraid this summer.


Me and Sidebraid. Sidebraid and Me.


I now know what Mary J. Blige means when she sings, "I never knew there was a love like this before."

I am ashamed to say that I wasn't inspired to try The Sidebraid until I saw this Jenna Marbles video. Sweet spot is the 1:11 mark.

"Hey, I went to college." Exactly~ (We at Narnilove <3 you, Jenna!)

I guess I always thought Sidebraid was a kids style? I am lucky enough to work in a casual environment where I can wear jeans and maintain a more laidback look, so I won't contemplate this one too much.

When I was a kid, the braid I was always stuck with was The French Braid.

Don't get me wrong: French Braid is gorgeous - and sometimes blended into one Sidebraid or several - but I would just like to sing the praises of the Sidebraid.

I also have too many memories sitting in a pool locker room or my parent's bedroom as my mom pulled at my hair attempting a perfect French Braid. Homegirl was obesessed with them. Still rocks the look.

I, however, don't feel that it is my look. It is not my soul. I am an impatient soul. I need something that takes 3 minutes or less and I am lucky enough to have straight, boring hair to wear the look. And also, I asymmetrical styles work better for me.

While I know this is an easy style to achieve, a few tips are helpful:

1) Dirty hair works best. Doesn't that additonal laziness just enhance the appeal?

2) If you're feeling greasy, get yourself some powdered shampoo. I use TIGI Rockaholic Dirty Secret Dry Shampoo.

3) Accept a little bit of messiness, expecially if your hair is layered.

4) Put a bird on it...in the form of a barette or hairpin. Or just any barrette really. I use one to secure the bottom ends that get away from the braid in the back of the head. Get creative with it; try this one or this one. Or OMG, a call to Narnilove's spirit animal, Mariah Carey, this one. Maymay, buy them all for me pleeeeaaase?!

I must admit, Sidebraid and I are trying to spice it up and have invited my other love interest from this summer to join us: biking!


Cuddles,
Honeyface

Thursday, August 22, 2013

Makeup Class Review: Sephora’s Wearing Color class


Did you know Sephora offers free makeup classes at some of their store locations? I decided to check out the Wearing Color class which explained how to wear and apply colored eyeliner and colored eye shadow. The class was fun and interesting.


For me, the best part about the class was getting to play with the makeup brushes and the makeup. We were able to try different types of brushes and different brand/colors of makeup. Even better, if we didn’t have a brand or color at our table that we wanted to try, someone would go get it for us. Now that’s service!
Generally, one of the things that I don’t like about going to beauty stores is that when I try the products, I feel obligated to buy them. At the class, there was no pressure to buy. Sephora just wants to teach you something about makeup.
Lets talk about the brushes. I used to own a complete set of high-end makeup brushes but I didn't get a chance to put them to work because somehow they got lost while in the hands of my boyfriend…and he doesn’t even wear makeup. Weird, right? I have just recently come to the realization that I am not going to find those brushes. MayMay needs new brushes. Since going to this class I now know which eye shadow brushes I would want to buy. Here are the brushes I liked:
First was the crease brush.


This brush is used to put eye shadow in the crease of your eye lid. I have seen this look before but never tried it myself. It really defines your eye and the color on your eyelids so you can peacock like the princesses you are.
Next is the eye shadow brush.

This brush was probably the most useful. It helps apply eye shadow to the eye lids. I like it because with the brush I can really pack the pigment onto my eyelids. It worked a lot better then the little sponge applicators that come with the eyeshadow. I feel like the sponges just move the shadow around and are not good for layering to add more "pop."
Last is the eye liner brush.

I liked this for getting a nice line of color below my lower eye lashes. It really helped to control where the color is going so you don't get a lot of fallout everywhere.
We tried some other brushes too but I didn’t feel like they were anything special or a necessity for applying eyecolor.
Then came the makeup! The main objective for this class was try colors outside of most people’s comfort zone and I love this! Unfortunately, the colors I did try didn’t work for me but now I know that thanks to this class. On the plus side, I found that I really like the Urban Decay Naked pallet. I know, I know, bitches have been on that shit forever. Also, their Naked nail polishes are sick. I. Must. Buy.
Overall, the class was good. It was a fun thing to do on a free Sunday morning. Yes, Sunday morning. Just think of it as going to the Church of Makeup. My local Sephora had the class from 9-11am prior to the store opening. Check with your Sephora to see when these classes are happening.
I would recommend going to the class if you have some time to kill and have a Sephora location nearby. I would not go out of my way for the class. It was interesting but it was also stuff you could learn on your own…or from reading us! 
Love, MayMay 

Wednesday, August 7, 2013

Easy Ombre Nail


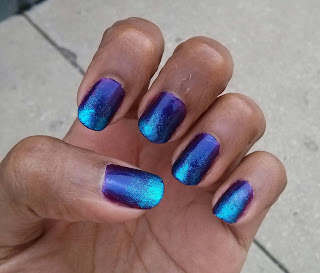
 Want a sick ombre nail set like in my pic? It just takes a few easy steps and patience. Yes, I know, we don’t have time to wait for those nails to dry and then reapply but BEAUTY IS PAIN and it's totes worth it!!!

First, get your nails ready as as you would normally do (filing, cuticle pushing, etc). As you can probably see, I have not yet mastered that part (but hopefully I’ll figure it out soon and share with you guys).

Next, go to your nail polish stash (Honeyface says: half of my collection is from MayMay. Just bragging!) and pick out 2 colors that will look fierce together. I used Wet n' Wild Shine Nail Color in Eggplant Frost (417F) that I purchased from Walgreen's for $.99 and Orly in It's Up to Blue. I believe the Orly color was a seasonal color because I am having a hard time finding it online. It regularly retails at $7.99 at CVS but I got it for 50% off!

Then take the color that you want near your nail bed and paint it all over your nails. Do as many coats as needed to make the polish opaque. For the Eggplant Frost color I used two coats to get the look. Make sure the polish has fully dried before moving on to the next step. If you wanna speed up the process, you can stick your hands in the freezer for a minute. That helps remove the moisture from the polish and makes them dry faster. Science is power!!!

Next, you will need a makeup sponge. Take the nail color you want at the tip of your nail and apply a SMALL AMOUNT to one of the corners of the sponge. Remember, you can add more polish but you can’t take it off unless you want to start painting your nails all over again.

Then start dabbing the sponge on your nail from the tip of your nail to about two-thirds of the way down. You will need to do this twice per nail to get the best result. As you are dabbing, there should be less and less polish on the sponge as you go down your nail to create the ombre pattern.

The dabbing will make the nail look a little rough so a clear top coat is definitely needed to finalize the look. 

So there you have it! An easy ombre nail that will make those bitches GAG! 

Let us know if you have any comments/questions about this nail look in the comments section below. We at Narnilove would love to hear your feedback!

Thanks, MayMay