Friday, September 27, 2013

How to get Matte Nails

This is going to be one of the easiest ways to get some bang with your nails. Making your nail color matte can really change the look of the polish. It's so easy to do, you're gonna freak! 

There are also nail polishes that come in matte form but if your like me you probably already have tons of colors and don't want to buy anymore. Who am I kidding I always want more. This is my way of trying to have some self control and not go out and buy a matte version of every color I own.

All you need to change the look of your nail polish is some steam. 

Yes steam, that's the trick.

Take a small pot and pour some water into it; just enough to cover the bottom of the pot. When less water is used the water will boil faster. Turn the heat on high and let the fire do its work.

While the water is boiling, paint your nails with about 2 coats of nail polish. I used Maybelline Color Show Nail Lacquer in 410 Impeccable Greys. This can be purchased from Target online for $2.99. (If you have a Target credit card you can also get 5% off and free shipping!)


Once the water is boiling, paint on one more THIN coat of the polish onto your nails. While they are still wet, stick your nails into the steam. Try to get as close to the water without actually touching it. That way the steam can really hit your nails. Like when you backhand a bitch for giving you the stink eye. Do this for about 3 seconds or a little longer if they don't look just right. (There is a possibility of burning yourself...so be careful.)


That is it! Wait to make sure the nails are dry and you now have matte nails! Now for every nail polish you have you can have a matte version. Bam! I just doubled your nail polish collection. Science is power! 

Happy Painting, MayMay

Wednesday, September 18, 2013

Maybelline Great Lash Mascara, $2.50 at Target


We at Narnilove have been wanting to try the new colorful mascaras that have been popping up but we haven't found the right deal until now! We like to do beauty on a budget whenever possible.
 

There are a few different displays that have shown up with the Maybelline colored mascaras. Some stand alones (like the picture shown) and some on shelves. The colors are I See Blue, Teal Appeal, Green with Envy, Wink of Pink, So Very Berry, and Vision in Violet.

Target has Maybelline Great Lash Mascara (in black or colored) for $4.50.

If you text "Beauty" to 827438 you will get a text message with a link to a few Target mobile coupons for Maybelline. One of the coupons is a $1.00 off Maybelline eye cosmetics item.

There is also a manufacturer's coupon for $1.00 off Maybelline mascara here.

Use Both Coupons and get $2 off which will get you the Maybelline Great Lash mascara for only $2.50! Great deal! The perfect time to try out some of the colorful mascaras!

A review on the colored mascaras will be coming soon ;)
 
Happy Shopping, MayMay

Monday, September 16, 2013

Narnilove Ventures onto the Field: Gameday Eye Makeup from a Chicago Bears Fan


Ever-inspired by Candied Stallion to step-up my make-up game, I decided to Bear Down...with my eyeshadow. 

Now, wearing team colors on your eyes can be a bit of a challenge - I didn't want to venture into clown territory. Bright colors can tend to overpower the face. You want to wear the color, but it's more like it's wearing you. (In Soviet Russia, color wears you!)

My beloved Bears team colors are Navy Blue, Orange and White. In order to wear these colors, I started off with a white, shimmery shadow on my lids. It's a loose mineral color from Sally's I use all the time when I'm incorporating bright colors on my eyes. It's old and the label has worn off so I don't know who makes it. It helps make the colors I use "pop" and keeps me from going to Clown Town:


Yeah, kind of needed coffe here. Depending on your skin tone, I urge you to experiment with different creme, off-white or white colors to see what works for you. I tend to wear colors easily as a more pale-but-olive-y tone.

OoO, now we get to add the colors, starting with orange. For everything I do, for everything that's true, I turn to...my Elf Make-up Palette, similar to this one here. Mine was purchased from Marshall's a few months ago but seems to be missing the make-up brushes. I purposely put the bright orange on my upper lid because I have learned from past shadow disasters* that light colors under my eyes takes away definition and makes me look tired and deathly:


And now it's time for the navy. I went with a blue that was in between true, bright blue and navy. A true, dark navy doesn't harmonize with this look. The key is to not be too meticulous about the colors you are using. You'll be wearing your lucky team t-shirt anyways that you only wash every other Tuesday so Robbie Gould doesn't miss, right? Right:


At any rate, to me, the blue seems a bit darker simply by being near the orange. Anyone with color theory knowledge want to comment on why that is, be my guest.

I tend to blend colors as I go but I realized that blending straight-up orange and white did not compute so I blended a wee bit of peachy copper in between the orange and white. I don't think it's all that noticeable in the pictures, but it tied the colors together for sure IRL. Again, you don't need to be exact...just make eye art.

If you're a Vikings fan using yellow on your lid, try a creamy gold to blend. Cardinals fan using red on your lids? Try a wee bit of pinkish red. Packers fan? Stab yourself in the eye, cheesehead:


These pictures are jarring because my face is not made-up. Bright colors on a bare face just look ugly when you don't tend to your skin. The face is the canvas. Buuuuut, I know that I am a messy artiste and I use my fingers (clean fingers, that is) to apply shadow. And that shit gets everywhere. So I often apply messy eye make-up before I do the other stuff like concealer, foundation, etc.

Also, I sometimes use tape to remove it the shadow bits that drift under my eyes:


Ah, that one hair stuck in there, right? I shed a lot.

Also, a word about finger application: It is how Kevin Aucoin rolled and it's how I roll a lot of the time. I do like me some fancy brushes, though.

Okieee, so after removing the white from under my eyes and blending some more, I did the Honeyface. Typically, I use Boscia B.B. Cream Broad Spectrum SPF 27 PA++L'Oreal True Match Super Blendable Concealer in Warm Fair/Light mixed with MAC Select Moisturecover (because the MAC color is too brown, we will discuss this at a different juncture, Candied Stallion), KorresWild Rose Mineral Illuminating Powder for skin highlighting, Everyday Minerals in Sherry's Radiant Creation to add a bit of blushy pink and a spritz of Heritage Products Rosewater & Glycerin spray for hydration. Oh, and I filled in my brows with NYX Eyebrow Cake Powder in Dark Brown/Brown prior to adding the eye shadow. I always fill in my brows. I'll cover my everyday products along with tips & tricks in another post soon:


Looks weird! Needs something, right? Black liquid liner! I have been using Rimmel Glam'Eyes Precise Design Liquid Eyeliner in Black Glamour and use it almost every day. That is the beginning of a wing you see...like the gentle wing of a baby sparrow hatching from an egg:


And it's fully lined now: 


So, I had a spot of A.D.D. while taking pictures and forgot to get the pic of my eyes with mascara. I was just really excited about this post! I used CoverGirl Natureluxe Mascara in Very Black and applied a couple of coats on the upper lashes and the lower. 

I then added a bit of my favorite lip gloss ever, Sephora Ultra Shine Lip Gloss in Cute Pink, and then another spritz of Rosewater Glycerine spray because I am 30 grown-ass-years-old and my skin was dry. Welcome to being old, ya'll!

Again, the finished result:


Did I catch that concealer crease under my eye on my way to meet my friends? Yes, I did. Oops.

In conclusion, the Bears beat the Bangles when I did this look last week and I think I contributed to a little bit of their winning magic. With makeup. Go Bears!

*Shadow Disasters, my new, fictional band's name.

Wednesday, September 11, 2013

Ulta Sale, Get up to 7 Products for only $8.50!

Their are a few sales going on this week (9/8/13 - 9/14/13) at Ulta on there Ulta brand Cosmetics. By stacking the sales and coupons available, you can get a great deal.

First, Ulta has eye cosmetics and lip cosmetics on sale for $4 each and nail colors for $2 each.


Next, they have a promotion where you can get a FREE Lip Balm, Single Eye Shadow or Gel Eye Liner Pencil with any $12 Ulta Cosmetics purchase.


Last, there is a $3.50 off $10 coupon.

You can mix and match your products selections to total $12 and then get a free item! I snagged 2 eye shadows and 2 nail polishes to hit the $12 point and then I got another eye shadow as my free product. I ended up with 5 items for only $8.50. With these discounts, the eye shadows amounted to $2.12 each and the nail polishes were $1.06 each.


As you can see from the picture above I am stereotypically Indian when it comes to gold. I feel like the song Gold by Macklemore & Ryan Lewis was written just for me!


Make sure you let them know about the free product at the register. When I made my purchase today, the price reduction for the free product wasn't automatic. I mentioned it to the cashier and she scanned a barcode to make the magic happen.

If you want the most bang for you buck, you could purchase 6 nail polishes to get to you $12 then get the free product and that would make 7 items for $8.50! I really like the Ulta products because of all the colors selections they have for there nail polishes and eye shadows.

Happy Shopping, MayMay

Thursday, August 29, 2013

Quick Inspirations - The Sidebraid


I'm having a love affair with The Sidebraid this summer.


Me and Sidebraid. Sidebraid and Me.


I now know what Mary J. Blige means when she sings, "I never knew there was a love like this before."

I am ashamed to say that I wasn't inspired to try The Sidebraid until I saw this Jenna Marbles video. Sweet spot is the 1:11 mark.

"Hey, I went to college." Exactly~ (We at Narnilove <3 you, Jenna!)

I guess I always thought Sidebraid was a kids style? I am lucky enough to work in a casual environment where I can wear jeans and maintain a more laidback look, so I won't contemplate this one too much.

When I was a kid, the braid I was always stuck with was The French Braid.

Don't get me wrong: French Braid is gorgeous - and sometimes blended into one Sidebraid or several - but I would just like to sing the praises of the Sidebraid.

I also have too many memories sitting in a pool locker room or my parent's bedroom as my mom pulled at my hair attempting a perfect French Braid. Homegirl was obesessed with them. Still rocks the look.

I, however, don't feel that it is my look. It is not my soul. I am an impatient soul. I need something that takes 3 minutes or less and I am lucky enough to have straight, boring hair to wear the look. And also, I asymmetrical styles work better for me.

While I know this is an easy style to achieve, a few tips are helpful:

1) Dirty hair works best. Doesn't that additonal laziness just enhance the appeal?

2) If you're feeling greasy, get yourself some powdered shampoo. I use TIGI Rockaholic Dirty Secret Dry Shampoo.

3) Accept a little bit of messiness, expecially if your hair is layered.

4) Put a bird on it...in the form of a barette or hairpin. Or just any barrette really. I use one to secure the bottom ends that get away from the braid in the back of the head. Get creative with it; try this one or this one. Or OMG, a call to Narnilove's spirit animal, Mariah Carey, this one. Maymay, buy them all for me pleeeeaaase?!

I must admit, Sidebraid and I are trying to spice it up and have invited my other love interest from this summer to join us: biking!


Cuddles,
Honeyface

Thursday, August 22, 2013

Makeup Class Review: Sephora’s Wearing Color class


Did you know Sephora offers free makeup classes at some of their store locations? I decided to check out the Wearing Color class which explained how to wear and apply colored eyeliner and colored eye shadow. The class was fun and interesting.


For me, the best part about the class was getting to play with the makeup brushes and the makeup. We were able to try different types of brushes and different brand/colors of makeup. Even better, if we didn’t have a brand or color at our table that we wanted to try, someone would go get it for us. Now that’s service!
Generally, one of the things that I don’t like about going to beauty stores is that when I try the products, I feel obligated to buy them. At the class, there was no pressure to buy. Sephora just wants to teach you something about makeup.
Lets talk about the brushes. I used to own a complete set of high-end makeup brushes but I didn't get a chance to put them to work because somehow they got lost while in the hands of my boyfriend…and he doesn’t even wear makeup. Weird, right? I have just recently come to the realization that I am not going to find those brushes. MayMay needs new brushes. Since going to this class I now know which eye shadow brushes I would want to buy. Here are the brushes I liked:
First was the crease brush.


This brush is used to put eye shadow in the crease of your eye lid. I have seen this look before but never tried it myself. It really defines your eye and the color on your eyelids so you can peacock like the princesses you are.
Next is the eye shadow brush.

This brush was probably the most useful. It helps apply eye shadow to the eye lids. I like it because with the brush I can really pack the pigment onto my eyelids. It worked a lot better then the little sponge applicators that come with the eyeshadow. I feel like the sponges just move the shadow around and are not good for layering to add more "pop."
Last is the eye liner brush.

I liked this for getting a nice line of color below my lower eye lashes. It really helped to control where the color is going so you don't get a lot of fallout everywhere.
We tried some other brushes too but I didn’t feel like they were anything special or a necessity for applying eyecolor.
Then came the makeup! The main objective for this class was try colors outside of most people’s comfort zone and I love this! Unfortunately, the colors I did try didn’t work for me but now I know that thanks to this class. On the plus side, I found that I really like the Urban Decay Naked pallet. I know, I know, bitches have been on that shit forever. Also, their Naked nail polishes are sick. I. Must. Buy.
Overall, the class was good. It was a fun thing to do on a free Sunday morning. Yes, Sunday morning. Just think of it as going to the Church of Makeup. My local Sephora had the class from 9-11am prior to the store opening. Check with your Sephora to see when these classes are happening.
I would recommend going to the class if you have some time to kill and have a Sephora location nearby. I would not go out of my way for the class. It was interesting but it was also stuff you could learn on your own…or from reading us! 
Love, MayMay 

Wednesday, August 7, 2013

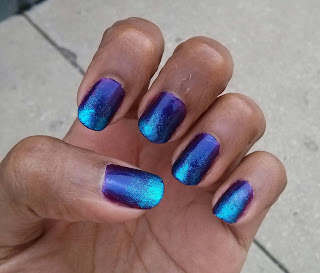
Easy Ombre Nail


 Want a sick ombre nail set like in my pic? It just takes a few easy steps and patience. Yes, I know, we don’t have time to wait for those nails to dry and then reapply but BEAUTY IS PAIN and it's totes worth it!!!

First, get your nails ready as as you would normally do (filing, cuticle pushing, etc). As you can probably see, I have not yet mastered that part (but hopefully I’ll figure it out soon and share with you guys).

Next, go to your nail polish stash (Honeyface says: half of my collection is from MayMay. Just bragging!) and pick out 2 colors that will look fierce together. I used Wet n' Wild Shine Nail Color in Eggplant Frost (417F) that I purchased from Walgreen's for $.99 and Orly in It's Up to Blue. I believe the Orly color was a seasonal color because I am having a hard time finding it online. It regularly retails at $7.99 at CVS but I got it for 50% off!

Then take the color that you want near your nail bed and paint it all over your nails. Do as many coats as needed to make the polish opaque. For the Eggplant Frost color I used two coats to get the look. Make sure the polish has fully dried before moving on to the next step. If you wanna speed up the process, you can stick your hands in the freezer for a minute. That helps remove the moisture from the polish and makes them dry faster. Science is power!!!

Next, you will need a makeup sponge. Take the nail color you want at the tip of your nail and apply a SMALL AMOUNT to one of the corners of the sponge. Remember, you can add more polish but you can’t take it off unless you want to start painting your nails all over again.

Then start dabbing the sponge on your nail from the tip of your nail to about two-thirds of the way down. You will need to do this twice per nail to get the best result. As you are dabbing, there should be less and less polish on the sponge as you go down your nail to create the ombre pattern.

The dabbing will make the nail look a little rough so a clear top coat is definitely needed to finalize the look. 

So there you have it! An easy ombre nail that will make those bitches GAG! 

Let us know if you have any comments/questions about this nail look in the comments section below. We at Narnilove would love to hear your feedback!

Thanks, MayMay

Wednesday, July 31, 2013

Introduction

We are MayMay and Jess aka Candied Stallion & Honeyface. We come from a galaxy far, far away to talk...about make-up. And skin care. And shoes. And headbands.

World, you have been warned.


(Candied Stallion & Honeyface at a Ke$ha concert...typical and fierce.)

<3
Honeyface